Note - This page is a Work in Progress! More detail will be added over time.
Process Overview
On this page I outline a recommended process for ensuring you get an archive-quality backup of a LaserActive title. As the steps given for RF backup are relevant for any LaserDisc, you can follow the steps here to properly archive any LaserDisc, of any format, storing any content. The decoding section will be largely applicable to other titles as well, however it will be primarily geared around NTSC laserdiscs with digital audio content, which is how LaserActive titles are all encoded.
Required Hardware
In order to follow this guide, you require the following:
- An LD-V4300D, LD-V4400, or LD-V8000 LaserDisc player
- Note that the CLD-A100 player itself is not suitable for this guide! If you attempt these steps on a CLD-A100 you will physically damage your player!
- In order to capture the full lead-in of the Laserdisc, a player with a non-interference design between the spindle and the mechanism/optical pickup is necessary. The CLD-A100, and likely many “retail” players, have an interference design, and when attempting to pre-seek into the lead-in you are likely to physically crash the guide for the optical pickup into a limiting bracket. When this happens the optical assembly jams, and you’re likely to cause physical damage and/or alignment issues with the pickup assembly.
- Due to the use of picture stop codes on the LaserActive, a player which supports the serial picture stop cancel command is greatly preferred. Although not documented as such, the LD-V4300D and LD-V4400 are two such players. A player without this feature can still be used, however it will require a lot more manual fiddling and some trial and error per disc. Some players may also ignore picture stop codes in test mode, which is used in this guide. The LD-V8000 is one such player.
- You should ensure your player is cleaned and calibrated, prior to taking archive-quality rips. A full teardown clean and comprehensive calibration guide is given on the Domesday Duplicator Wiki. Note that if your player is in good condition, you can likely skip most of the steps, but an attempt should be made to verify the condition of the laser and to ensure the player is functioning correctly, ideally using the GGV1069 test disc. In particular, you should check for cross-talk, and correct such issues before making archive-quality rips, or all your rips will need to be repeated. Every player I’ve seen exhibited cross-talk, and required calibration to correct it. This will be very difficult to do without the GGV1069 disc. This was easy to obtain in 2018, but today it will be difficult to locate one.
- A serial cable connection between your player and your PC
- This is not optional. Being able to seek into the lead-in, skip picture stop codes, and play into the lead-out in one continuous playback requires a player in test mode with serial control.
- A serial cable can be made with basic parts and connected to a USB/serial bridge device. See the Domesday Duplicator Wiki for information on how to construct this cable.
- A direct connection to the RF signal on your player
- See the Domesday Duplicator Wiki
- I prefer to use a pre-made BNC cable such as the Altech 933844001 connected directly to the test header and routed out of the case
- An RMC12010 service remote (preferred) if using the LD-V4300D or LD-V4400
- See the Domesday Duplicator Wiki for more info on this remote
- Note that as of today (2024-10) this can still be found on ebay new
- OR a normal player remote with speed control (such as the RU-V103), and a method to enter test mode on your player without the service remote.
- Consult your player documentation for instructions on how to enter service mode. This can be done on the LD-V4300D, LD-V4400, and LD-V8000 using the front panel controls.
- An assembled Domesday Duplicator 3.0
- This is composed of a DE0-Nano FPGA Development Board and a Cypress FX3 SuperSpeed explorer kit, interfaced with a capture board that connects to the RF output from the Laserdisc player.
- You are very, very strongly recommended to use the latest firmware, currently available on the mainline version of the repository, not the 2.3 release branch. Sequence checking was added to the firmware to detect lost samples, and this is critical for ensuring you are getting full, accurate backups of the RF signal. Without this, you may be missing data randomly throughout the capture, and won’t know about it.
- A Windows-based PC with USB 3.0 ports and a lot of HDD space
- If you’re going to use Linux, see below for info about increasing your “usbfs_memory_mb” buffer size.
- Desktops are preferred over laptops as there’s less hidden devices on the USB bus, and generally less power management messing with the USB power profiles. If your laptop can generate a capture without errors though, it’s fine to use.
- A Laserdisc to play (of course)
Preparation for Archiving
In addition to an appropriate Laserdisc player, you will need this enhanced version of the Domesday Duplicator capture software:
DomesdayDuplicatorUsbFixRC.zip
This is a Windows-only build of the software. If you are running on Linux, download and build the “UsbCommsRewrite” branch from the fork at following repository:
https://github.com/RogerSanders/DomesdayDuplicator/tree/UsbCommsRewrite
The changes in this version of the software intended to be merged back with the main repo, and this page will be updated when that is done.
Before attempting to perform an archive of a disc, you must ensure your hardware is all connected and working correctly. The test mode of the Domesday Duplicator software should be used for an extensive period, preferrably 12 hours or so, to ensure that no errors or missed data packets occur. The test mode is designed to verify every single sample matches an expected result, so if this test passes you can have confidence the capture hardware is working properly and your PC is keeping up with the transfer. A dedicated machine should be used where possible, so that nothing requiring too much CPU, RAM, or HDD bandwidth runs during the test or capture process. While the version of the capture software provided above should be fairly resilient to high CPU loads, approaching a low RAM situation will likely lead to missed data, which will be detected by the capture program and report an error, as long as you are not using an old version of the firmware on your Domesday Duplicator hardware. Ensure you are using the latest version of the firmware, or you will have absolutely no protection against missing data, you will simply have missing data in your capture file, corrupting your signal, which won’t become evident until much later.
One of the most significant requirements is for enough HDD space. Raw RF captures are quite large. A single side of a CAV disc will take up around 150GB, and this process will involve capturing each side 5 times. That’s 750GB of storage per side. If a CLV disc is being captured, the storage requirements are double that. After capture, the raw RF files will be compressed to FLAC, which will cut down the filesize to approximately 1/3, IE, a single side of a CAV disc will then take up 50GB * 5 = 250GB, or 100GB * 5 = 500GB for CLV. Ensure you have sufficient storage for the process you are about to commence, and remember that for archival purposes, you must keep these RF files, not delete them. For a cheap storage option, look at sites like ebay for sellers offering high capacity, ex-server SATA platter drives. These can often be found in sizes over 10TB for significantly less than new, as commercial operations often turn over these drives when they reach the 2-3 year mark to minimize their chances of a live failure, when it’s more expensive to fix and has potential service impacts.
At this point, before beginning capturing of real content, perhaps the most important step is to ensure you have set your RF gain appropriately. If you are using the recommended LD-V4300D, LD-V4400 or LD-V8000 players, and your RF gain settings within the player are correctly adjusted, you will have a peak RF output of 400mV on the test port, and the correct configuration of the Domesday Duplicator is to set dipswitch 2 in the dipswitch block to on, and the other 3 positions off, for a gain value of 4.4. The goal is to ensure no clipping, even during transient “spikes” that occur with the output signal. If you are observing the amplitude graph or average ampliude reading in the Domesday Duplicator application, this will often result in a lower amplitude than you may expect. Don’t be concerned by this, it’s a rough indicator of the presence and strength of the current signal, not something to rely on for adjustment. To confirm your RF gain settings are correct, you will need to perform a full capture of a 30cm (full size) CAV disc. Note, this must be CAV specifically! CLV discs have a lower RF signal strength that stays fairly constant throughout, as the spindle slows down as the laser advances towards the outer edge of the disc. CAV disks on the other hand spin at the same rate as they advance, meaning the RF signal strength increases towards the outer edge of the disc, reaching maximum strength at the outermost edge of the disc. You will also see transient “spikes” on top of the base RF signal. The goal here is to absolutely minimize, and ideally totally eliminate clipping. In order to verify your captures are avoiding clipping, you must take a capture of a 30cm CAV disc, in 16-bit signed mode (which is little-endian). After that capture is done, there are two things you can use to verify your RF gain settings from the result:
-
View the output as raw PCM data in a WAV program like Adobe Audition or Audacity. This will allow you to visually inspect the entire waveform. This will look something like the following:
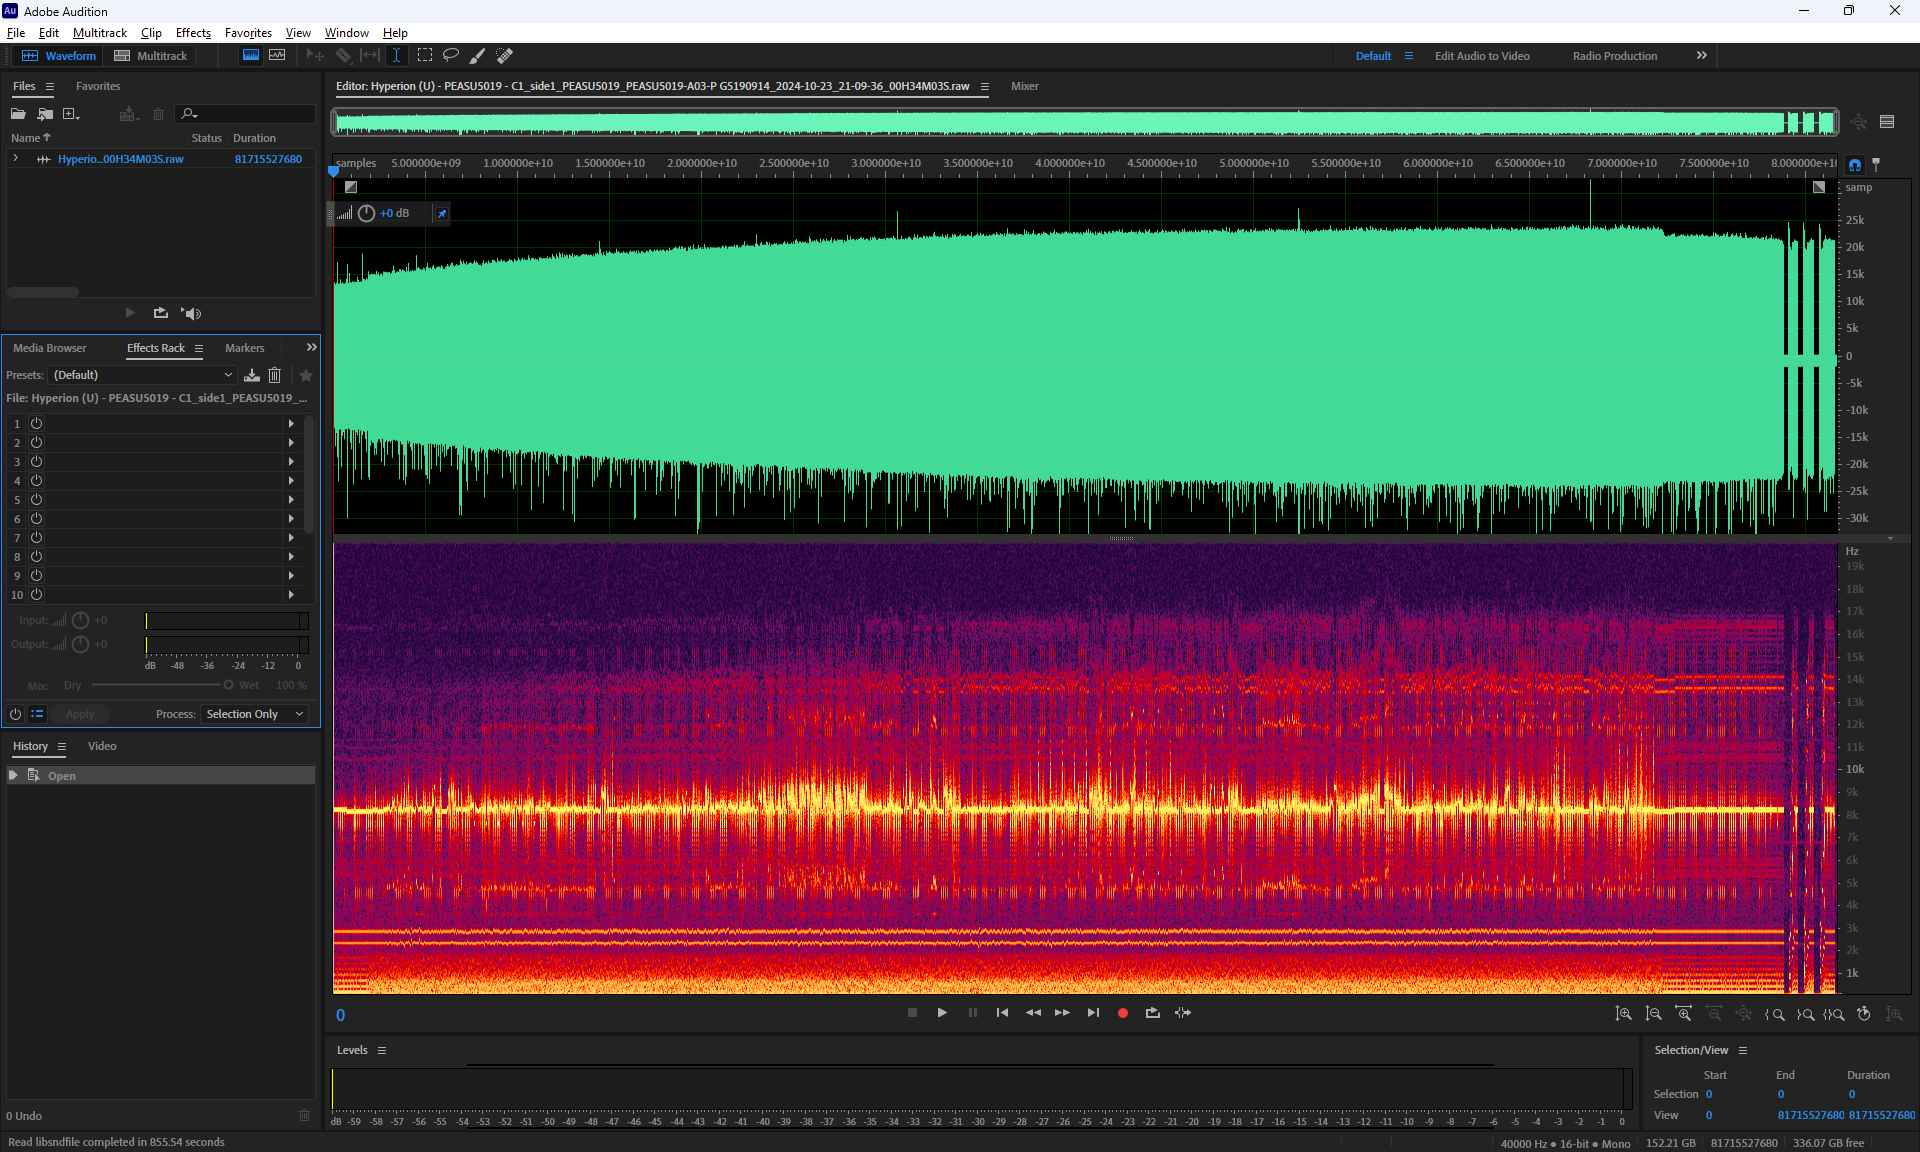
You can get a feel for the overall signal level across the entire capture with this process, and zoom in on areas of interest. Note that the overall signal level is going to sit significantly lower than these transient spikes, as you can see in the above capture. This is why you should not rely on the amplitude reported in the Domesday Duplicator capture app. As the Laserdisc format uses frequency modulation to encode signals (see the Laserdisc format section for more info), the decode process is not overly sensitive to amplitude. While a very low amplitude would hurt effective precision of the sampled waveform, an 8-bit capture is perfectly sufficient to perform quite good RF signal decoding, while the Domesday Duplicator captures in 10-bit. If your signal is sitting at 1/4 of your total possible amplitude, there is still more than enough precision to properly demodulate the RF signal. Additionally, subsequent rips can be used to improve the overall quality of the decoded result. Clipped samples on the other hand, represent unrecoverable loss of data. -
Check the sample stats in the accompanying .json file that was created alongside the .raw capture file. At the top of the file, you’ll find a “captureInfo” section like the following:
 "captureInfo": {
     "clippedMaxSampleCount": 0,
     "clippedMinSampleCount": 109,
     "durationInMilliseconds": 2043549,
     "fileSizeWrittenInBytes": 163433152512,
     "maxSampleValue": 1008,
     "minSampleValue": 0,
     "numberOfDiskBuffersWritten": 77931,
     "sequenceMarkersPresent": true,
     "transferCount": 1246975,
     "transferResult": 1
 },
In this example, we’ve got a full, successful capture from a 30cm CAV disc. In this case we can see there was no clipping in the positive direction, as “clippedMaxSampleCount” is 0. This means not a single sample in the captured data was clipped in the positive direction. Further below we see the “maxSampleValue” was 1008. The maximum sample value we can capture on the Domesday Duplicator is 1023, so we got quite close to, but not reaching that value. On the negative direction, we had 109 clipped samples, reaching the minimum value of 0. That’s actually quite acceptable. Transient spikes are something you expect to see during disc playback. We have a total of 109 clipped samples, out of 81,716,576,256 total samples (fileSizeWrittenInBytes / 2). This is perfectly fine. We do multiple rips of the disc precisely so that spikes like this, which may be from actual signal content, introduced errors from scratches, mastering errors, random partcles of dust crossing the laser, or other unpredictable stray interference, can be cancelled out with successive rips where possible. Due to the analog nature of these discs, variation is expected. A subsequent rip of the same disc right after this one, without even opening the tray, gave these results:
 "captureInfo": {
     "clippedMaxSampleCount": 0,
     "clippedMinSampleCount": 353,
     "durationInMilliseconds": 2043518,
     "fileSizeWrittenInBytes": 163433152512,
     "maxSampleValue": 1011,
     "minSampleValue": 0,
     "numberOfDiskBuffersWritten": 77931,
     "sequenceMarkersPresent": true,
     "transferCount": 1246975,
     "transferResult": 1
 },
Again, this is fine. This is actually quite good in fact. My advice would be that clipped sample counts in the range of a hundred or so per billion samples are acceptable on a correctly calibrated player in my experience. If you’re seeing significantly higher than this, it could be a sign that something needs adjustment. At this point reaching out for a second opinion or advice on the Domesday Duplicator discord server may be helpful.
Making RF Backups
Assuming you’ve read all the above sections, and you’re not using the CLD-A100 player or another interference-design player so you don’t cause physical damage, this section will detail how to get a raw RF capture of the full surface of any Laserdisc, from the innermost ring of the lead-in, to the outermost edge of the lead-out. Ensure you have all the required hardware above before beginning. Detailed steps will follow which are complete and accurate for the LD-V4300D, LD-V4400, and LD-V8000 players, however they should be adaptable to other models, as long as they have a non-interference design between the optical pickup and the rest of the assembly, as detailed above. You MUST ensure you know this is the case before attempting a capture.
Note that the CLD-A100 player itself is not suitable for this guide! If you attempt these steps on a CLD-A100 you will physically damage your player! You have been warned!
Pioneer LD-V4300D or LD-V4400
The Pioneer LD-V4300D and LD-V4400 players are essentially slight variations of each other, and both are equivalent for capture purposes. The LD-V4400 cannot normally play PAL discs, but it can if reflashed with LD-V4300D firmware for the mechanical controller. Note however that all LaserActive discs are NTSC only.
- Ensure your Domesday Duplicator is connected to both the PC and player
- Configure the Domesday Duplicator to capture in “16-bit signed scaled” format. This is a 16-bit signed raw PCM file in little-endian mode.
- Ensure you are connected to the Laserdisc player via the serial port
- Turn on the Laserdisc player
- Disable Picture Stop codes
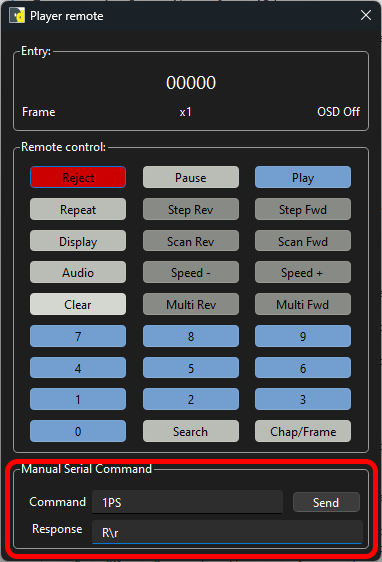
- Send serial command “1PS” on the player remote in Domesday capture app. This will be remembered until the player is powered off.
- If you want to attempt to use a player that does not support the 1PS command, your only alternative is to press the “Multi Fwd” button on the player remote in the Domesday capture app when you want to start playing the disc. This will play through picture stop codes, however you must press the “play” button on the unit itself once after the stop codes have been passed in order to allow playback into the lead-out, otherwise the player will stop automatically when the lead-out is reached.
- Put the player into service mode
- Via RMC12010 control:
- Press “ESS” button
- Press “TEST” button
- Via RMC12010 control:
- Turn on tilt tracking in service mode
- Via RMC12010 control:
- Press “SPEED +” button
- Via RU-V103 control:
- Press “SPEED UP” button
- Via RMC12010 control:
- Load the Laserdisc into the player
- Eject tray
- Load disc
- Close tray
- Spin up the disc
- Press “Play” on front of unit
- Player should show “Tracking Close” on the display and be playing through at normal speed
- Capture the user code data
- From the Domesday Duplicator app, select “View -> Player remote”
- Under “User code data”, press the “Read” button, and wait for it to be populated.
- Change tracking to “Open”
- Via Front panel/RMC12010 control/RU-V103 control:
- Press “PLAY” button once
- The player should now be showing an unstable image at a single disk location without advancing
- Via Front panel/RMC12010 control/RU-V103 control:
- Seek to innermost ring of Laserdisc
- This is where you’ll physically damage your player if you haven’t read all the above warnings
- Via front panel:
- Press “SCAN «” button
- Via RMC12010 control:
- Press “SCAN «” AKA “Left blue arrow” button
- Via RU-V103 control:
- Press “SCAN REV” button.
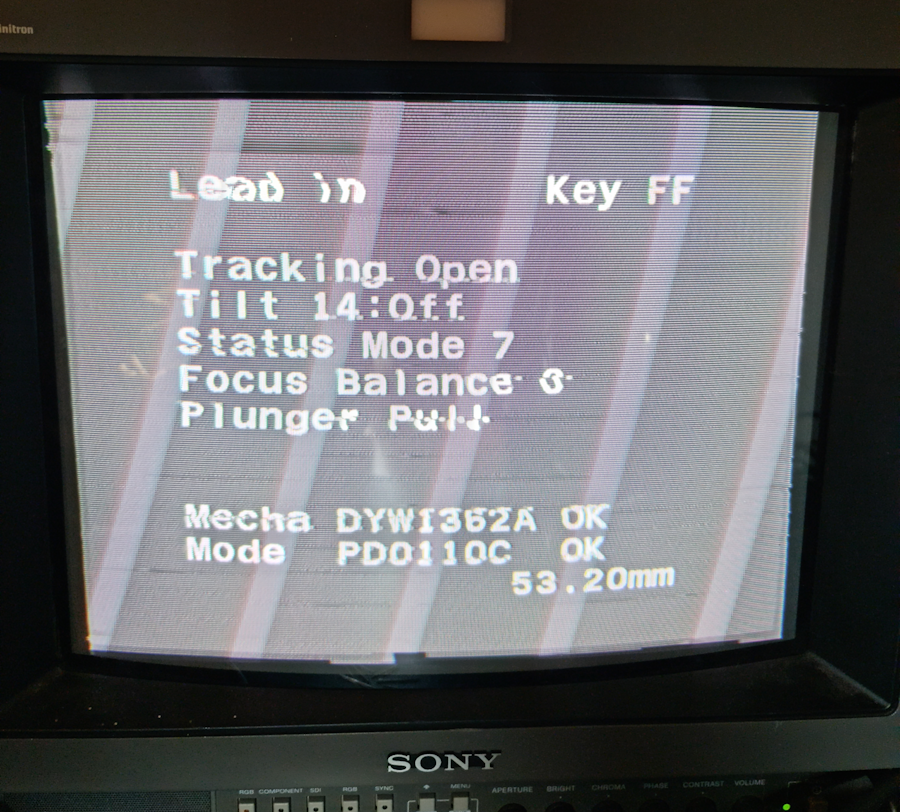
- Hold button until seeking stops and display reads around “53.20mm” or “52.85mm”
- The player may “overshoot” the start of the disc, and it might take a few seconds for it to successfully find the innermost ring of the disc where tracking is present. Give it a few gentle attempts if you need to and get a feel for it.
- Start recording in Domesday Duplicator
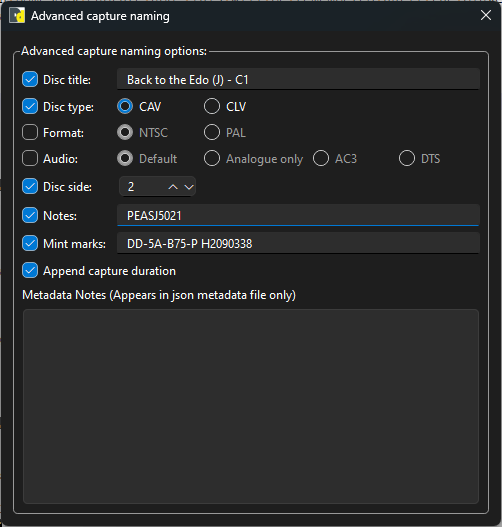
- Set “Advanced capture naming” panel to capture all appropriate info
- Set disc title, type, side as per the disc.
- Add “C[X]” to the end of the title where “[X]” is the number of this capture, starting at 1. We’ll be archiving each side of each disc 5 times, to allow some error correction for the analog nature of the content.
- Set “Notes” to the disc catalog number (IE, PEASJ1012)
- Set “Mint Marks” to the two separate marks on the side of the disk being read, one etched, one stamped (IE, “PEASJ5021-A08-P H2090743”). Note that since the laser is on the underside, the mint marks are the ones on the side facing down, opposite to what the labels will say.
- This information will be saved into the .json metadata file that accompanies the capture
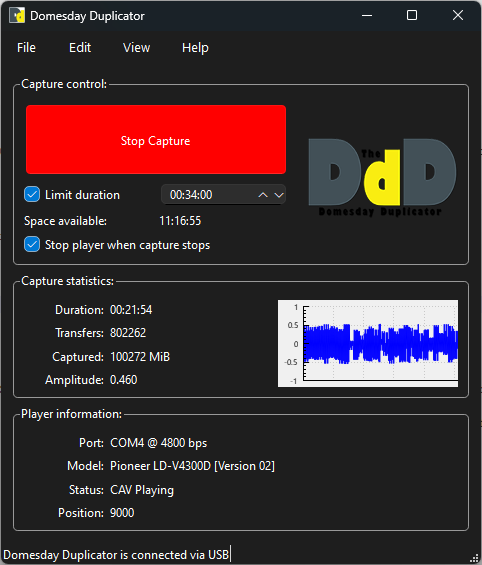
- Select “Stop player when capture stops” on main UI
- Makes it easier to leave the player unattended. You can still manually stop earlier if you can see the end of the disc has been reached.
- Set the “Limit duration” option based on the disc type
- For CAV “00:34:00”
- For CLV “01:04:00”
- Press the “Capture” button to start capture
- Set “Advanced capture naming” panel to capture all appropriate info
- Enter test mode playback
- Via Front panel/RMC12010 control/RU-V103 control:
- Press “PLAY” button once
- Press “PLAY” button a second time
- Pressing play once will “Close” tracking and the picture will stabilize. The player is currently in still-frame mode. Since you’re in the lead-in however, it will be playing at normal speed, it won’t pause until it reaches the end of lead-in.
- Pressing play a second time will enter test play mode. Under this mode it will continue to play when the lead-in ends, and will continue to play into the lead-out until the end of the disc is reached.
- Via Front panel/RMC12010 control/RU-V103 control:
- Let the disc play until tracking is lost and the disc stops playing, or starts looping at the end of the disc.
- For a full CAV disc, this happens at the following point:
- Around 145.95mm or 146.65mm
- 34:00 maximum capture duration
- Around 150GB filesize
- For a full CLV disc, this happens at the following point:
- Around 145.95mm or 146.65mm
- 1:04:00 maximum capture duration
- Around 300GB filesize
- When the player goes off the end of the disc, the picture will turn to static. The player may automatically stop shortly after, or it may instead seek back a little way and start playing the last bit of the lead-out again. It may also quietly and gracefully start looping on the last frame. It will vary between disc.
- For a full CAV disc, this happens at the following point:
- Perform the previous steps from loading the disc onwards 5 times for each side of each disc being archived
Pioneer LD-V8000
The Pioneer LD-V8000 was the top industrial player available from Pioneer, and is a very capable player for capturing discs. It is more flexible than the LD-V4300D/LD-V4400 as it uses a documented NEC V25 CPU, and has no embedded firmware for the main CPU or mechanical controller. Like the LD-V4300D/LD-V4400, it is capable of playing the full disc from the innermost ring to the outermost past the end of lead-out. It is also capable of playing PAL discs when under service mode. It does have some firmware shortcomings that make serial control difficult under service mode, however I have modded the firmware to fix the errors and add some features, including the ability to capture the mechanical pickup location during playback, which is saved in json metadata files when making captures. The custom firmware is available here: ##TODO## Host firmware
- Ensure your Domesday Duplicator is connected to both the PC and player
- Configure the Domesday Duplicator to capture in “16-bit signed scaled” format. This is a 16-bit signed raw PCM file in little-endian mode.
- Ensure you are connected to the Laserdisc player via the serial port
- Turn on the Laserdisc player in service mode
- Hold down “Display” button on front panel when pressing power button
- Enter “Diagnostic” mode
- With the “Display Check” screen visible, press the “Display” button on the front panel
- Load the Laserdisc into the player
- Eject tray
- Load disc
- Close tray
- Capture the user code data
- Press “Play” to start the disc playing, and wait for the picture to appear.
- From the Domesday Duplicator app, select “View -> Player remote”
- Under “User code data”, press the “Read” button, and wait for it to be populated.
- Enter “Service” mode
- From “Diagnostic” mode, press the “Display” button on the front panel
- Press “Still/Step FWD” button twice on front panel to highlight “Service Mode”
- Press “Still/Step REV” button once
- Press “Display” button to show picture
- Change tracking to “Open”
- Press “Still/Step REV” button once
- The player should now be showing an unstable image at a single disk location without advancing
- Seek to innermost ring of Laserdisc
- Start recording in Domesday Duplicator
- Set “Advanced capture naming” panel to capture all appropriate info
- Set disc title, type, side as per the disc.
- Add “C[X]” to the end of the title where “[X]” is the number of this capture, starting at 1. We’ll be archiving each side of each disc 5 times, to allow some error correction for the analog nature of the content.
- Set “Notes” to the disc catalog number (IE, PEASJ1012)
- Set “Mint Marks” to the two separate marks on the side of the disk being read, one etched, one stamped (IE, “PEASJ5021-A08-P H2090743”). Note that since the laser is on the underside, the mint marks are the ones on the side facing down, opposite to what the labels will say.
- This information will be saved into the .json metadata file that accompanies the capture

- Select “Stop player when capture stops” on main UI
- Makes it easier to leave the player unattended. You can still manually stop earlier if you can see the end of the disc has been reached.
- Set the “Limit duration” option based on the disc type
- For CAV “00:34:00”
- For CLV “01:04:00”
- Press the “Capture” button to start capture
- Set “Advanced capture naming” panel to capture all appropriate info
- Enter service mode playback
- Press “Still/Step FWD” button once
- This will “Close” tracking and the picture will stabilize. Under this mode it will continue to play when the lead-in ends, and will continue to play into the lead-out until the end of the disc is reached. On this player, picture stop codes are ignored in service mode (but not diagnostic mode).
- Let the disc play until tracking is lost and the disc stops playing, or starts looping at the end of the disc.
- For a full CAV disc, this happens at the following point:
- Around 145.95mm or 146.65mm
- 34:00 maximum capture duration
- Around 150GB filesize
- For a full CLV disc, this happens at the following point:
- Around 145.95mm or 146.65mm
- 1:04:00 maximum capture duration
- Around 300GB filesize
- When the player goes off the end of the disc, the picture will turn to static. The player may automatically stop shortly after, or it may instead seek back a little way and start playing the last bit of the lead-out again. It may also quietly and gracefully start looping on the last frame. It will vary between disc.
- For a full CAV disc, this happens at the following point:
- Perform the previous steps from loading the disc onwards 5 times for each side of each disc being archived
Decoding RF Backups
##TODO##
